前段时间在PDD剁手了好几个斐讯DC1插排,众所周知,斐讯的服务器已经是关得差不多了,并且我手里也有一两个N1,何不利用起来呢?然后又在恩山论坛上看到了N1有了大雕的OPENWRT,刷上当旁路由真的是美滋滋,如果配上个无线超强的K2P真的是赛过神仙,可惜我用的是垃圾歌华链,但是我又要当旁路由,又要运行Home Assistant,OPENWRT本身的仓库中的Python似乎并不是很完整,我安装后死活无法正常使用,于是乎想了想,倒不如直接在OPENWRT运行DEBIAN,并运行Home Assistant呢?8嗦了,开干!
一、在U盘或者移动硬盘中写入OPENWRT
这部分的话,可以直接使用恩山中的帖子的镜像文件来写入U盘,直接插入启动。
参考:https://www.right.com.cn/forum/forum.php?mod=viewthread&tid=539268
二、配置旁路由
在N1上将LAN的IP改成静态的,并且设置成和主路由不冲突的IP,例如,我的主路由是192.168.1.1 ,所以我将N1设置成192.168.1.129
另外需要关闭LAN的DHCP分配
其他选项
网关:主路由IP,例如我的是192.168.1.1
iPV4广播:192.168.1.255
DNS:192.168.1.1
三、主路由上设置:
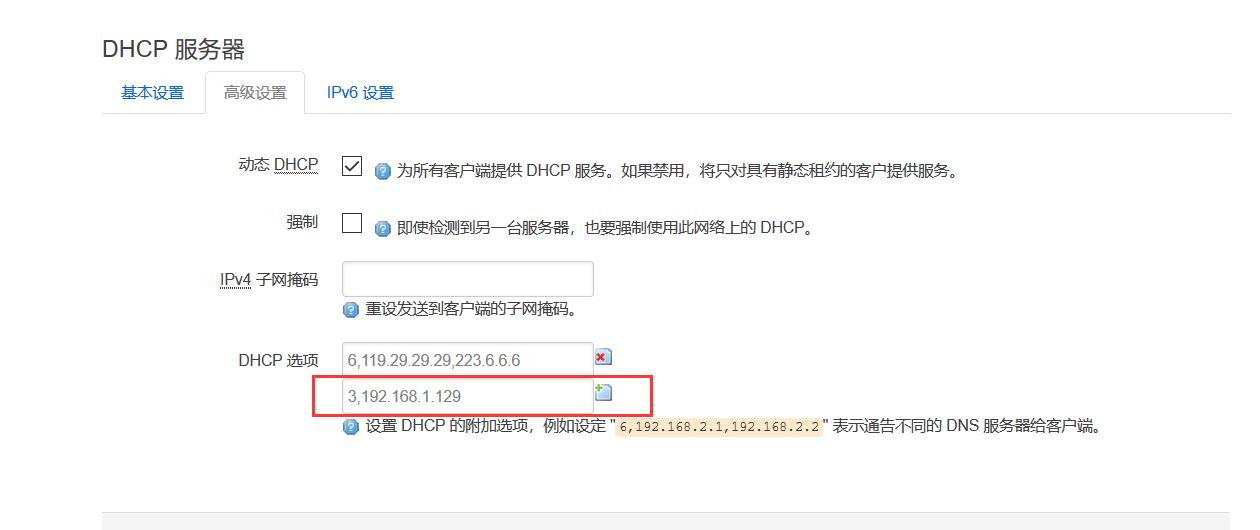
主路由设置上比较简单,直接将lan接口的DHCP高级设置的DHCP选项加上“3,192.168.1.129”就行了,如图
四、安装debootstrap与debian&HomeAssistant
SSH链接N1
#更新源
opkg update
#安装debootstrap
opkg install debootstrap
#下载Debian
debootstrap --arch=arm64 stretch /mnt/sda3/debian http://deb.debian.org/debian
#等待下载完成后,切换到Debian子系统
chroot /mnt/sda3/debian /bin/bash
#从“root@N1:~#”变为“ root@N1:/#” 就代表成功切换到Debian
#更新Debian软件
 apt-get update -y
 apt-get upgrade -y
#安装python3 python3-venv python虚拟空间 python3-pip python包管理器
apt-get install python3 python3-venv python3-pip
#安装openssl
apt-get install libssl-dev
#安装ffi库
apt-get install libffi-dev
#新建homeassistant用户
useradd -rm homeassistant
#转到/srv目录,建立homeassistant文件夹
cd /srv
mkdir homeassistant
#更改此文件夹的所有者和所属组
sudo chown homeassistant:homeassistant homeassistant
#切换到homeassistant用户
su -s /bin/bash homeassistant
#切换目录,创建并进入虚拟环境
cd /srv/homeassistant
python3 -m venv homeassistant_venv
source /srv/homeassistant/homeassistant_venv/bin/activate
#虚拟环境下安装pip
pip install --upgrade pip
#正式安装HomeAssistant,速度会非常快
pip3 install homeassistant
#运行Hass测试,需要时间较久,看到成功后直接在浏览器输入 IP:8123
hass
五、开机启动
#切换到Debian子系统,新建启动脚本
cd /etc/init.d/
touch hass-daemon
chmod +x hass-daemon
#编辑hass-daemon
vim hass-deamon
#脚本内容
#!/bin/sh
### BEGIN INIT INFO
# Provides:          hass
# Required-Start:    $local_fs $network $named $time $syslog
# Required-Stop:     $local_fs $network $named $time $syslog
# Default-Start:     2 3 4 5
# Default-Stop:      0 1 6
# Description:       Home\ Assistant
### END INIT INFO

# /etc/init.d Service Script for Home Assistant
# Created with: https://gist.github.com/naholyr/4275302#file-new-service-sh
PRE_EXEC="cd /srv/homeassistant; source /srv/homeassistant/homeassistant_venv/bin/activate;" #预备运行命令
# Typically /usr/bin/hass
HASS_BIN="hass"
RUN_AS="homeassistant"  #用户名
PID_DIR="/var/run/hass"
PID_FILE="$PID_DIR/hass.pid"
CONFIG_DIR="/home/$RUN_AS/.homeassistant" #配置文件路径
LOG_DIR="/var/log/homeassistant"
LOG_FILE="$LOG_DIR/home-assistant.log"
FLAGS="-v --config $CONFIG_DIR --pid-file $PID_FILE --log-file $LOG_FILE --daemon"

start() {
  if [ ! -d "$PID_DIR" ]; then
    echo "It seems you did not run"
    echo -e "\tservice hass-daemon install"
    return 1
  fi
  if [ -f $PID_FILE ] && kill -0 $(cat $PID_FILE) 2> /dev/null; then
    echo 'Service already running' >&2
    return 1
  fi
  echo -n 'Starting service… ' >&2
  local CMD="$PRE_EXEC $HASS_BIN $FLAGS;"
  su -s /bin/bash -c "$CMD" $RUN_AS
  if [ $? -ne 0 ]; then
    echo "Failed" >&2
  else
    echo 'Done' >&2
  fi
}

stop() {
  if [ ! -f "$PID_FILE" ] || ! kill -0 $(cat "$PID_FILE") 2> /dev/null; then
    echo 'Service not running' >&2
    return 1
  fi
  echo -n 'Stopping service… ' >&2
  kill $(cat "$PID_FILE")
  while ps -p $(cat "$PID_FILE") > /dev/null 2>&1; do sleep 1;done;
  rm -f $PID_FILE
  echo 'Done' >&2
}

install() {
  echo "Installing Home Assistant Daemon (hass-daemon)"
  update-rc.d hass-daemon defaults
  create_piddir
  mkdir -p $CONFIG_DIR
  chown $RUN_AS $CONFIG_DIR
  mkdir -p $LOG_DIR
  chown $RUN_AS $LOG_DIR
}

uninstall() {
  echo "Are you really sure you want to uninstall this service? The INIT script will"
  echo -n "also be deleted! That cannot be undone. [yes|No] "
  local SURE
  read SURE
  if [ "$SURE" = "yes" ]; then
    stop
    remove_piddir
    echo "Notice: The config directory has not been removed"
    echo $CONFIG_DIR
    echo "Notice: The log directory has not been removed"
    echo $LOG_DIR
    update-rc.d -f hass-daemon remove
    rm -fv "$0"
    echo "Home Assistant Daemon has been removed. Home Assistant is still installed."
  fi
}

create_piddir() {
  if [ ! -d "$PID_DIR" ]; then
    mkdir -p $PID_DIR
    chown $RUN_AS "$PID_DIR"
  fi
}

remove_piddir() {
  if [ -d "$PID_DIR" ]; then
    if [ -e "$PID_FILE" ]; then
      rm -fv "$PID_FILE"
    fi
    rmdir -fv "$PID_DIR"
  fi
}

case "$1" in
  start)
    start
    ;;
  stop)
    stop
    ;;
  install)
    install
    ;;
  uninstall)
    uninstall
    ;;
  restart)
    stop
    start
    ;;
  *)
    echo "Usage: $0 {start|stop|restart|install|uninstall}"
esac
#离开子系统debian
exit
#脚本安装下,就是更新到rc.xd
chroot /mnt/sda3/debian /bin/bash service hass-daemon install
#返回如下
Installing Home Assistant Daemon (hass-daemon)
#脚本启动
chroot /mnt/sda3/debian /bin/bash service hass-daemon start
#在N1 Openwrt启动项中的exit 0 前加入
chroot /mnt/sda3/debian /bin/bash service hass-daemon start
六、安装MQTT
#安装mosquitto
apt-get install mosquitto
#更改mqtt设置(本来没有这文件,直接运行以下命令创建)
vim /etc/mosquitto/conf.d/mqtt.conf
#在上面文件里加入:
port 1883
listener 1884
protocol websockets
allow_anonymous false
password_file /etc/mosquitto/pwfile
#设置用户和密码,这里用户为mqtt,可改为你想设的用户名,回车后会让你输入密码,密码自设输入两遍
sudo mosquitto_passwd -c /etc/mosquitto/pwfile mqtt
#启动MQTT服务
/etc/init.d/mosquitto start
#在N1 Openwrt启动项中的exit 0 前加入:
chroot /mnt/sda3/debian /bin/bash /etc/init.d/mosquitto start
#测试MQTT服务是否安装正常,请使用我最新发布的MQTT服务测试页面:
http://www.hassmart.com/products/switches/#tab=mqtt-test
本文参考以下论坛帖子,补充了一些细节
参考2:Ubuntu/Debian/树莓派安装MQTT(无坑版)


发表评论